Page Tree
Software Knowledgebases
This Chapter discusses procedures for building your applications and running them, either for testing or for production.
Factory Studio has the capability to run multiple projects at the same time, simply by changing the port. Users can run multiple instances of the same project using the Runtime and the Test mode. This can enable development and testing without requiring production to stop.
| On this page: |
|---|
When your application is ready to try out, you can test it in one of the following ways:
You can run the project using both test and startup at the same time.
For information about using the diagnostic tools available, see "Using the Diagnostic Tools" below.
To test the application:
Do one of the following:
Field | Description |
UserName | Enter a valid username to access the application. |
Password | Enter the password that corresponds to the username. |
Project Server | Read-only. Displays the IP address or name of the computer where the project is based on the configuration on the Server tab. |
Port | Displays the port FactoryStudio uses for access. For test, it uses 3201. For startup, it uses 3101. These ports must be open on the server. |
PortWA | Displays the port FactoryStudio uses for access with Windows Authentication. For test, it uses 3202. For startup, it uses 3102. These ports must be open on the server. |
Use only Windows Authentication | Check if the system can only accept Windows Authentication. |
Startup Computer | Read-only. Displays whether the configured server is the local computer or a remote server. |
Execution Path | Overrides the default execution path, which is the project file location. |
Module Information | Run the Module Information tool. |
Property Watch | Run the Property Watch tool. |
Trace Window | Run the TraceWindow tool. |
Run Modules | Select which Modules execute when running the project. |
Status | Field shows current running and connected or disconnected status.
|
Enable Online Configuration | Select to let changes you make to the project apply immediately to the test runtime. You must also be connected to the running project (see Status setting above). |
You can use Enable Online Configuration to apply changes on real-time. All changes must be saved before they can appear on screen.
After starting the project, the Startup window displays the status (running or not running) of each module in your application. In addition, it lets you enable any or all of the following diagnostic tools: PropertyWatch (Watch), TraceWindow (Trace), and ModuleInformation (Info).
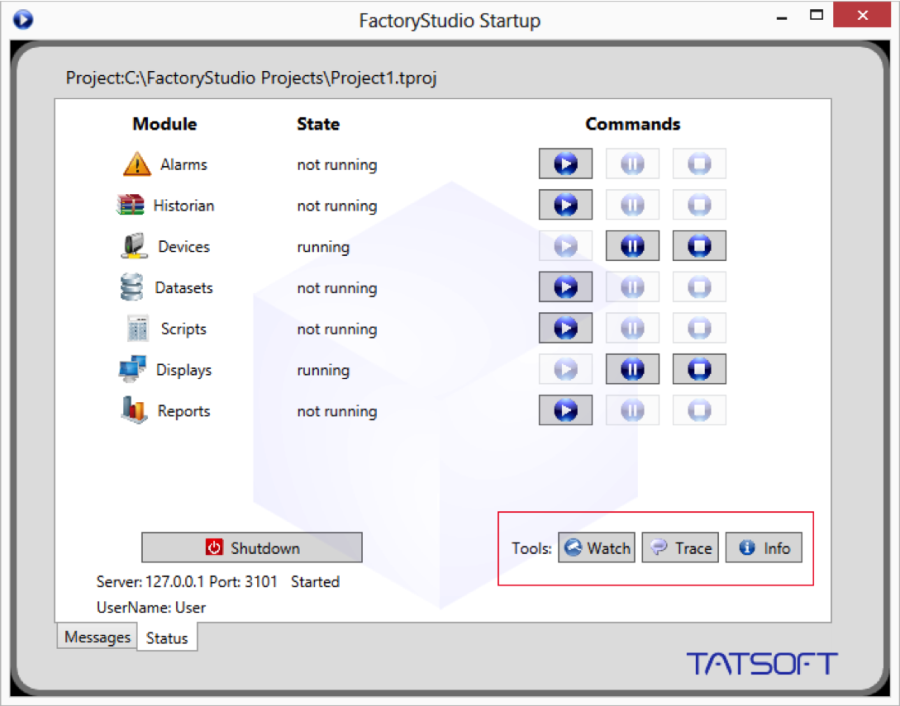
The tools you select will begin running in separate windows as long as your application is running. If you do not see these windows you may find them minimized at the bottom of your screen.
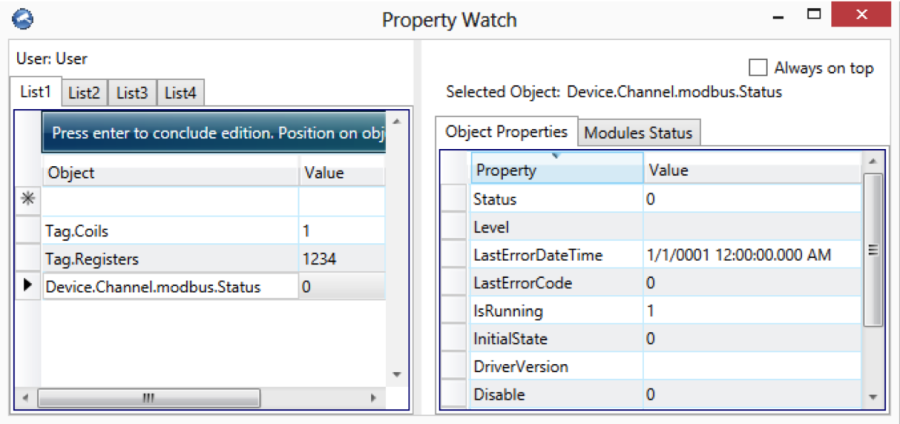
Property Watch
Property Watch is a diagnostic tool used to access tags and internal properties of the system for reading or writing. Type the name of the property in the Object column, and its value, if any, will appear in the Value column.
When you type the name of an object type (e.g. "tag") followed by a dot, Intellisense will provide a list of all the available objects. You may select any object from this list, (e.g. "tag.index"), or you may select the type itself (e.g. "tag"). In each case the value, if any, will be given, and all applicable properties with their values will appear in the right hand panel on the "Object Properties" tab.
If you select the "Modules Status" tab, you will see the original status panel. While the project is running, you can start or stop individual modules at any time.
You can also change object and property values from the Property Watch screen as long as the changes are permitted.
Trace Window
The Trace Window is a tool that displays system messages in a data grid interface. The messages contain status information (based on Edit > Channels > Settings column) about reads, writes, unsolicited, TX frames (sent), and RX (received).
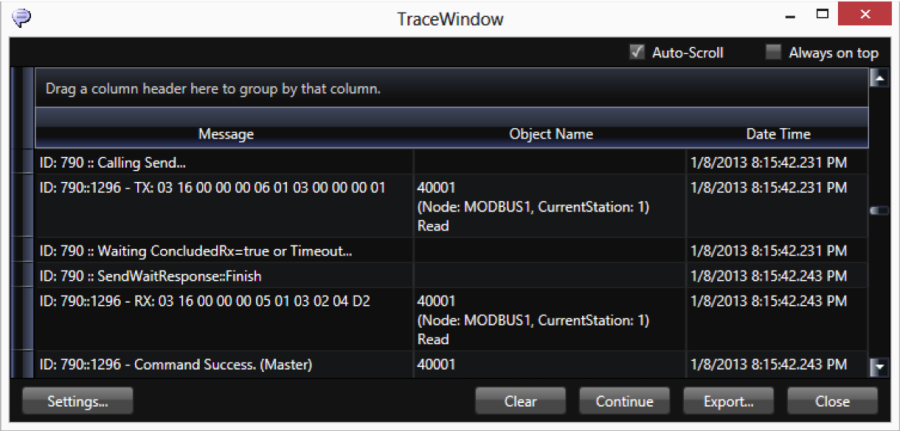
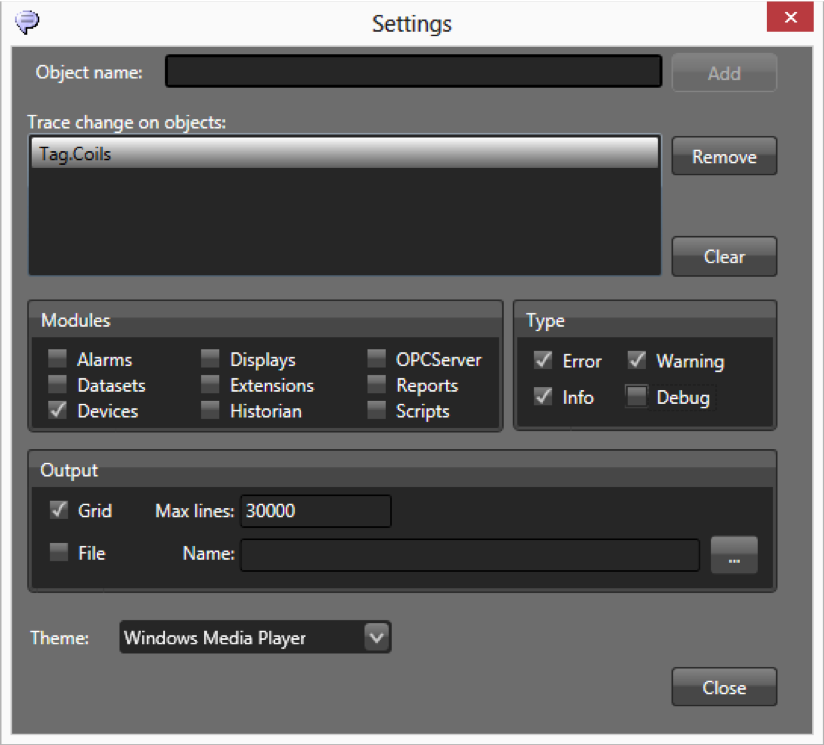
When checking the Devices check box in the Settings, we suggest you enable only the error, info and warning information, not the debug information, otherwise you will create too much data. For ControlLogix devices, it is very important to use this tool, as the system will display the invalid addresses in the configuration.
Click Settings in the Trace Window to select options for message types and modules, data formats, or to save to file. You can also configure a tag in the Object Name field and click Add to select that object to include on the monitoring.
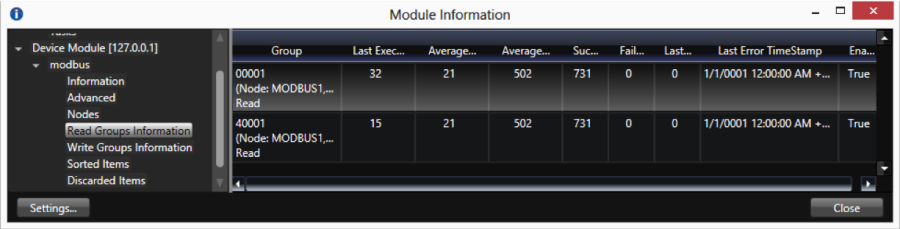
Module Information contains information about the operation of the modules. Select the Devices Module and a specific channel to get information about the functioning of the communication channel.
The Read Groups Information provides information about the virtual reading groups, runtime of each item, quantities of readings and readings that have failed, and also reports on the code and date/time of the last error.
To use the Module Information:
When running the Enterprise version in test mode, the system only reads from the field devices, even if you have a configuration to write to field.
You can run the application with online configuration enabled, so you don't need to start and stop the application when modifying the configuration. You can modify PLC addresses, access types, and most of the application and see the real-time the results on your running application. You can use the Startup window or the PropertyWatch "Module Status" tab to start and stop only one module, like Devices, instead of restarting the whole runtime system.
FactoryStudio is constantly compiling the module you are editing in the background and validating all scripts and displays. If you have not run a full build, the BuildStatus column reflects any warnings or errors found during the background compile process.
Double-click a row with a red X to go to the source of the warning or error. Warnings are informational and do stop the script from running. Errors prevent the specified script from running, but do not affect the whole application. If a script or display has a warning, it will still run.
Periodically, you should run a full build:
To build the application:
When checked, a backup of the project connected with that build is automatically created. It is also possible to pack a project without building. To do this just click on the "Pack" button.
Tracking configuration changes
FactoryStudio provides many ways to help you to keep track of the project configuration changes:
Publishing the Project
Publishing the project creates a read-only version of the project.
It is NOT necessary to publish the project to install it for production. In scenarios where you intend to have continuous changes to the project in field, it may be simpler to put the main project file, "tproj", directly on the production computer.
The main benefit of publishing is that the system creates a compact and real-only version of the project file. The file created has the same name of the project file, with the publish version number and the extension "trun". This allows the system to comply with regulated industries.
The typical scenarios that lead to using the publish command are:
The "trun" file is always read-only, but you may optionally hide the project configuration from the end-user as well. This is an independent option defined in the Security System. If you don't want end-users to see the project configuration, remove the permission of the GUEST user and other users to edit the project before publishing it.
To publish the project:
There are a few runtime objects that provide information about running the project.
The Info namespace is the main location for runtime status. The main objects on that namespace are:
Info.Project: information about the project that is running
Info.License: information on the license
Info.Module: Information and start/stop command to Modules
Info.Trace(): displays a message on the TraceWindow
Info.TestMode: shows if the project is running in Test Mode
The Server namespace has information about the server computer.
The Client namespace has information about each client computer. running a graphical interface.
See "Namespaces" for the complete programming reference on runtime objects.